

How To Change All Of One Color In Gimp
GIMP makes information technology possible for you to edit photos in virtually whatsoever fashion that you'd like. This includes color replacement, or selecting a color (or range of colors) in your image and replace it with another. In this tutorial nosotros'll be going over a uncomplicated workflow that will allow you to replace a color in GIMP with any colour y'all'd like.
In short, the mode to replace a colour in GIMP is by creating a selection around that color using the Select By Color tool, then replace it using the Colorize feature. The Select By Color tool allows us to edit but a specific color in a given image by clicking on an area of an image that contains the desired color. The Colorize feature allows us to alter the color of a given selection.
It'south a simple workflow, but it does crave several steps and attention to particular regarding the tool's settings. Allow's dig in!
Supplant A Color In GIMP
The following video tutorial will walk y'all through the entire procedure, step-past-stride:
Go on on for the written tutorial.
Stride 1: Grab the Select By Color tool and adjust the tool settings accordingly
To supervene upon a colour in GIMP we will first have to designate a color in the prototype to be replaced. Or in other words, we will have to "select" it. The mode we'll be selecting a color to replace is past using the Select Past Color tool.
The tool can be accessed in the tools menu on the left-manus side of your screen:

Alternatively, you can access it using the keyboard shortcut: Shift + C
This tool allows you to create a pick on your paradigm based on color(south) of your choosing. One time selected, you lot'll be able to make common color transformations, and since the target selection just includes pixels that are a color of your designation, the transformations will be confined only to those pixels.
The all-time part nigh the Select By Color tool? It allows yous to select a single colour or multiple variations of the aforementioned shade. This will be incredibly useful based on your prototype and what exactly information technology is you're trying to accomplish.
Next, reference the tool settings menu on the bottom-left portion of your screen:
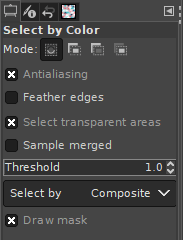
The settings are every bit follows:
- Antialiasing: this makes it and then that your selection have make clean edges that blend seamlessly. Without information technology enabled you till end up with hard, jagged edges, then it is recommended to leave information technology enabled.
- Feather Edges: this setting makes it and then the edges of your choice volition be softened, sort of similar what y'all'd get subsequently applying a Gaussian blur. Although this setting has its uses, it can be problematic when trying to supercede a colour in GIMP, so leave it disabled for this tutorial.
- Select Transparent Areas: this setting, when enabled, will allow you to select transparent areas of your image the same mode you lot would select colors. This is irrelevant when looking to supplant colors, so y'all can leave it disabled or enabled. It doesn't affair either way.
- Sample Merged: will select colors on all layers in your certificate if enabled. This is merely relevant if you're working with an paradigm that has multiple layers. If you are only looking to supplant a color in a single image then chances are y'all do not have multiple layers and you tin can ignore this setting.
- Threshold: this represents the number of colors to be selected. If set to 1, only one color will exist selected (the color you click on.) If you'd like to catch nearby pixels that may have a similar (but slightly off) shade, you tin increase this slightly.
- Draw Mask: this setting, when enabled, will create a pinkish mask over the choice you create. This is not actually part of the blueprint; it'south at that place for your reference. Since information technology makes it easier to see exactly what it is you're selecting, it is recommended that y'all exit it enabled.
It is recommended that you go out the Threshold set at 1. If you need to grab boosted colors, this can be accomplished while creating the choice in step 2. This approach volition brand it easier to eyeball what the threshold needs to be instead of guessing numbers.
Pace 2: Click on an area of the image that contains the colour you'd similar to supervene upon
Now it's fourth dimension to create a choice around the color you'd like to replace.
With the Select By Color tool enabled and the proper tool settings from stride 1 in place, just click on an area of your prototype that contains the color you'd similar to replace:
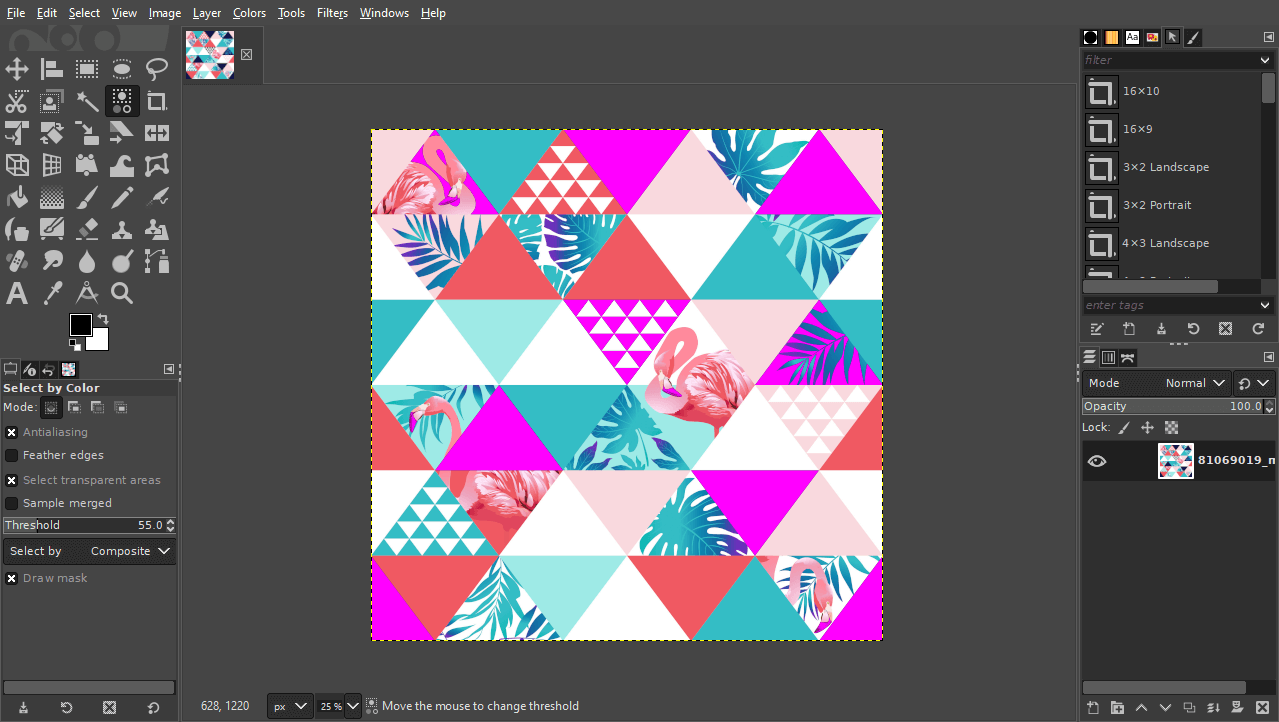
You volition notice a pink mask while property the click, and then you will notice a dotted marquee going around the choice once you release the click.
To select more than colors, hold the click and slowly move your mouse towards the correct. Y'all will discover that the pink mask grows in size, indicating that you are grabbing more colors to replace:
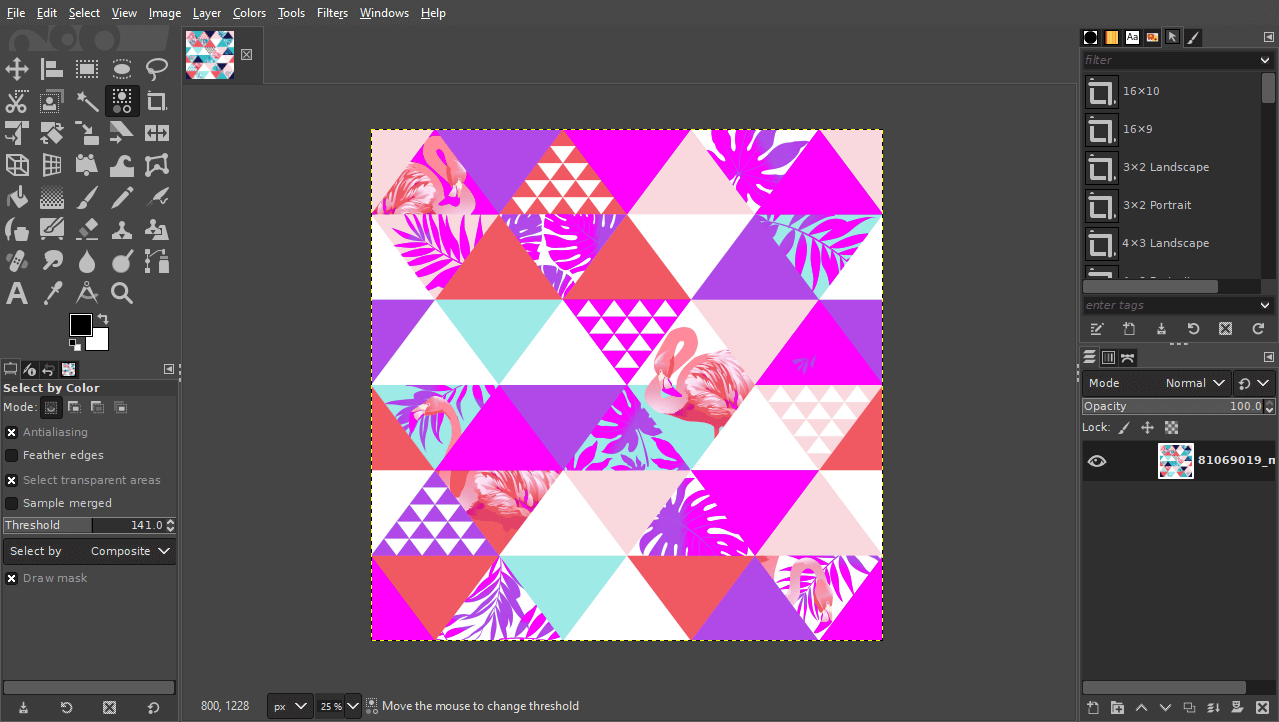
Moving your paw back towards the left volition decrease the number of colors sampled. You can use this back and forth mitt motility to manually adjust the threshold of the option.
One time yous have successfully selected all of the colors/shades yous'd similar to replace, you can release the click. The dotted marquee around around selection indicates that any alterations made moving frontwards will be bars to this expanse.
Step 3: Change the color using the Colorize carte
Now that we've isolated all of the pixels on the image that comprise the color we'd like to supercede, it's time to change them.
There'south various different ways that you can change your colors, only for this tutorial nosotros will exist using the Colorize feature, which is recommended if you are only looking to replace a color in GIMP.
To access it, navigate to:
Colors > Colorize
The menu should await something similar this:
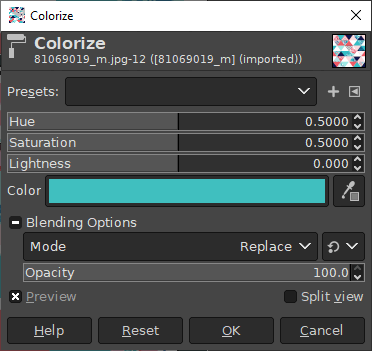
The menu settings function as follows:
- Hue: this represents the colour being applied. Move this slider dorsum and forth to bicycle through different colors.
- Saturation: this represents the intensity of the color. Moving it towards the correct volition make the color more vibrant and noticeable, whereas moving it towards the left will make information technology duller.
- Lightness: this represents how bright or night the color is. Adjust this slider every bit needed.
- Color: this is an indicator of the new color currently being practical.
Play around with these settings a chip to get the color change you're seeking. Every image is different, and then the settings you lot should utilise will depend entirely on the composition of your prototype and what exactly y'all are trying to achieve.
I of the benefits of using the Colorize feature to replace a colour in GIMP is that information technology allows you to input a numerical code for a specific color you'd similar to apply.
If you'd like your replacement color to be a specific HEX or RGB value, simply click on the colour bar within the menu to open up a color picker menu:
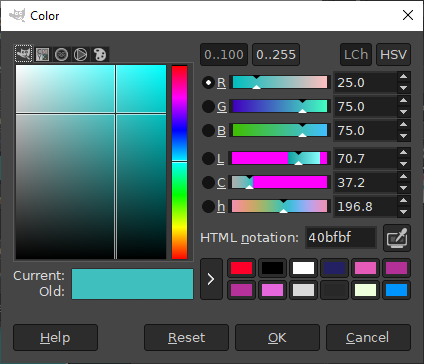
Every bit you tin come across, yous'll be able to cull your colour past whatever of the post-obit values:
- RGB
- LCH
- HSV
- HEX/HTML Notation
Once you are finished choosing your replacement colour, click the OK button to utilise the changes.
Footstep 4: Release the selection
Once you are finished applying your replacement colour, you should notice that the dotted marquee (or "selection") is still active on the sheet.
The final stride in this lesson is to remove the choice. This can be done by navigating to:
Select > None
Alternatively, you lot can use the following keyboard shortcut instead: Shift + Command + A
If washed correctly, you volition have successfully replaced a colour in your image! Here's the finished result of the sit-in, along with a before and after:

Conclusion
Knowing how to replace a colour in GIMP tin be a superpower once yous know how it'southward done. You tin change the colour of literally annihilation you want! Not happy with the colour of your machine, or your pilus, or your shirt? Not a problem! GIMP tin be used to make those alterations.
Unfortunately, information technology doesn't handle this task too as other applications (such as Illustrator) practice, but it works well enough for a free and Open Source solution.
If you have whatever questions or need clarification on whatsoever of the steps taken in this lesson just leave a comment below.
Become A Primary Of GIMP!
Want to learn more near how GIMP works? Check out The GIMP Series – a comprehensive collection of over threescore videos where I get over all of the major tools, features and functions in GIMP and explicate what they practise, how they work, and why they're useful.

Become A Master of Adobe Illustrator!
Desire to learn more almost how Adobe Illustrator works? Check out my Illustrator Explainer Series - a comprehensive collection of over 100 videos where I go over every tool, feature and role and explicate what information technology is, how it works, and why it's useful.
Logos Past Nick LLC is a participant in the Amazon Services LLC Associates Program, an chapter advertising program designed to provide a means for sites to earn advertizing fees by advertising and linking to Amazon.com. As an Amazon Associate I earn from qualifying purchases. Read affiliate disclosure hither.

Source: https://logosbynick.com/replace-a-color-in-gimp/
Posted by: swihartthits1936.blogspot.com
0 Response to "How To Change All Of One Color In Gimp"
Post a Comment